15 Stunning Bow Nail Ideas for Every Style
Bow nails can feel romantic, playful, minimal, or even a little dramatic, depending on the colors and finishes around the ribbon detail. The ideas below pair bows with popular nail looks, from sheer pink and French tips to plaid, chrome, and tortoiseshell.
Whether you’re planning a salon visit or trying a design at home, you’ll find options for different styles and comfort levels. Some looks use simple painted lines or decals, while others call for sculpted 3D details that make one nail the focus.
Use the colors and placement as a starting point, then adjust the design to suit your nail length and shape. A small bow can work beautifully on short nails, while longer nails offer more room for patterns, frames, and dimensional accents.
1. Sheer Pink Nails with 3D Pearl Bows
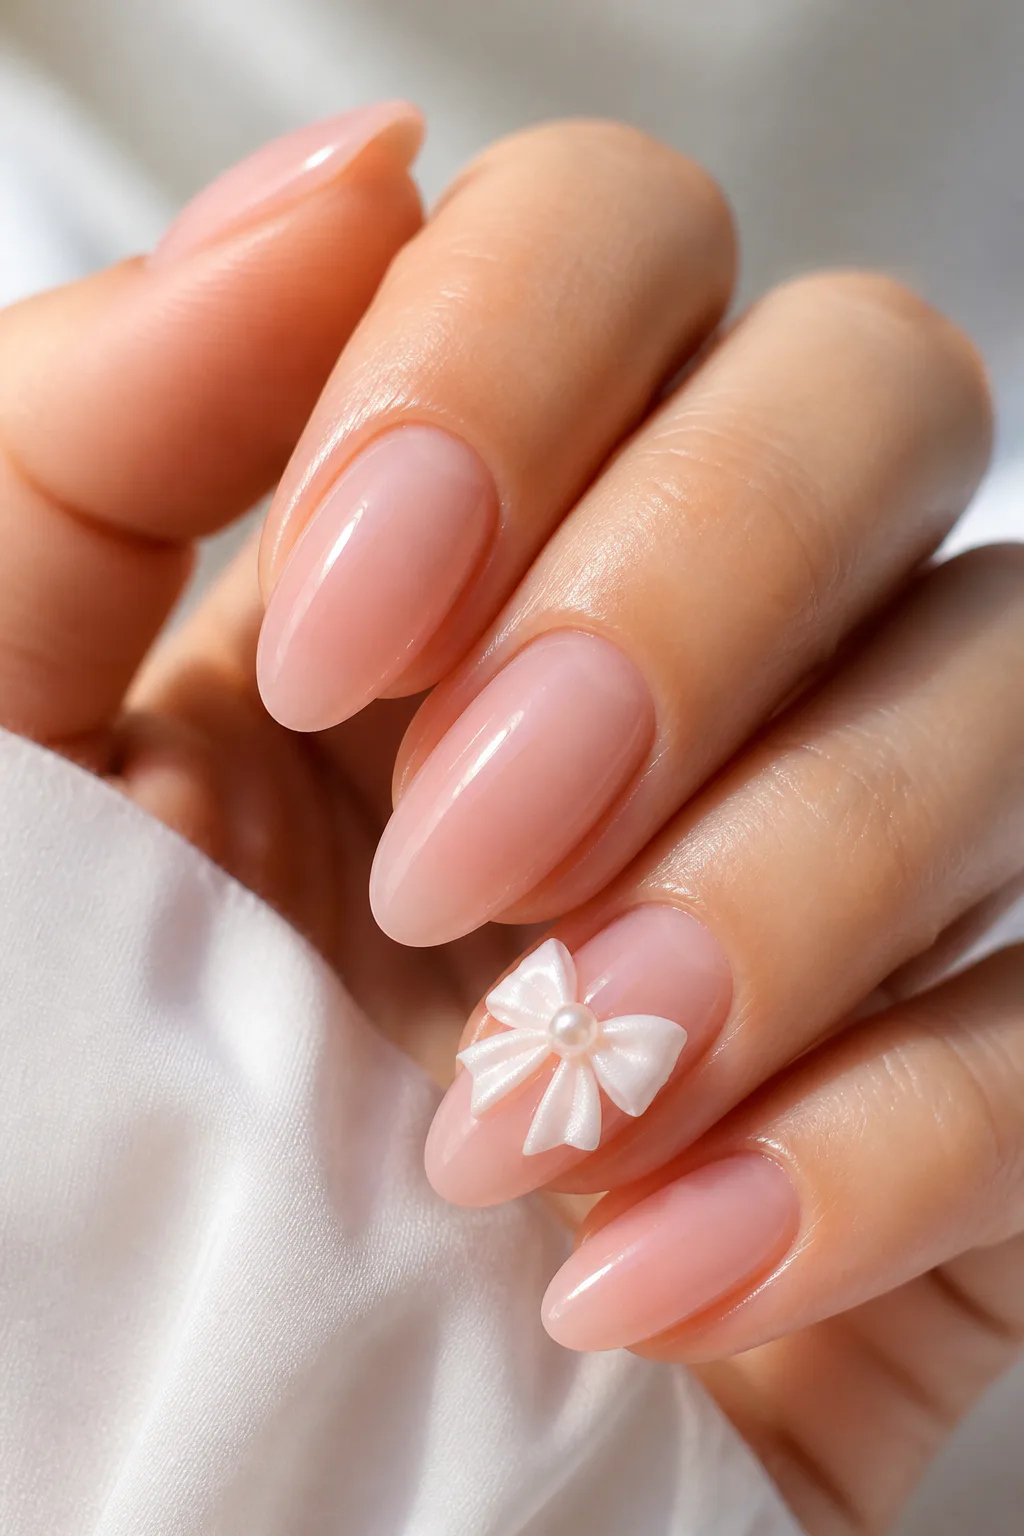
A sheer milky-pink base gives this bow design a soft, polished look without hiding the natural nail. On one accent nail, a sculpted white bow adds dimension, while a tiny pearl at its center brings in a delicate detail that feels romantic rather than overly ornate.
This combination suits almond and oval shapes especially well, but it can be scaled down for short, rounded nails. Keeping most nails simple lets the 3D bow stand out, making the look a sweet choice for celebrations, date nights, or everyday wear when you want a little extra charm.
How to keep the look balanced
Ask for a slim bow with rounded loops and a petite center pearl. A high-gloss finish helps the sheer pink look fresh and makes the white accent read clearly against the base.
- Use one bow accent nail for a subtle result.
- Choose a milky or strawberry-pink sheer polish.
- Keep the remaining nails free of extra embellishments.
2. Nude Nails with Minimal Black Ribbon Bows
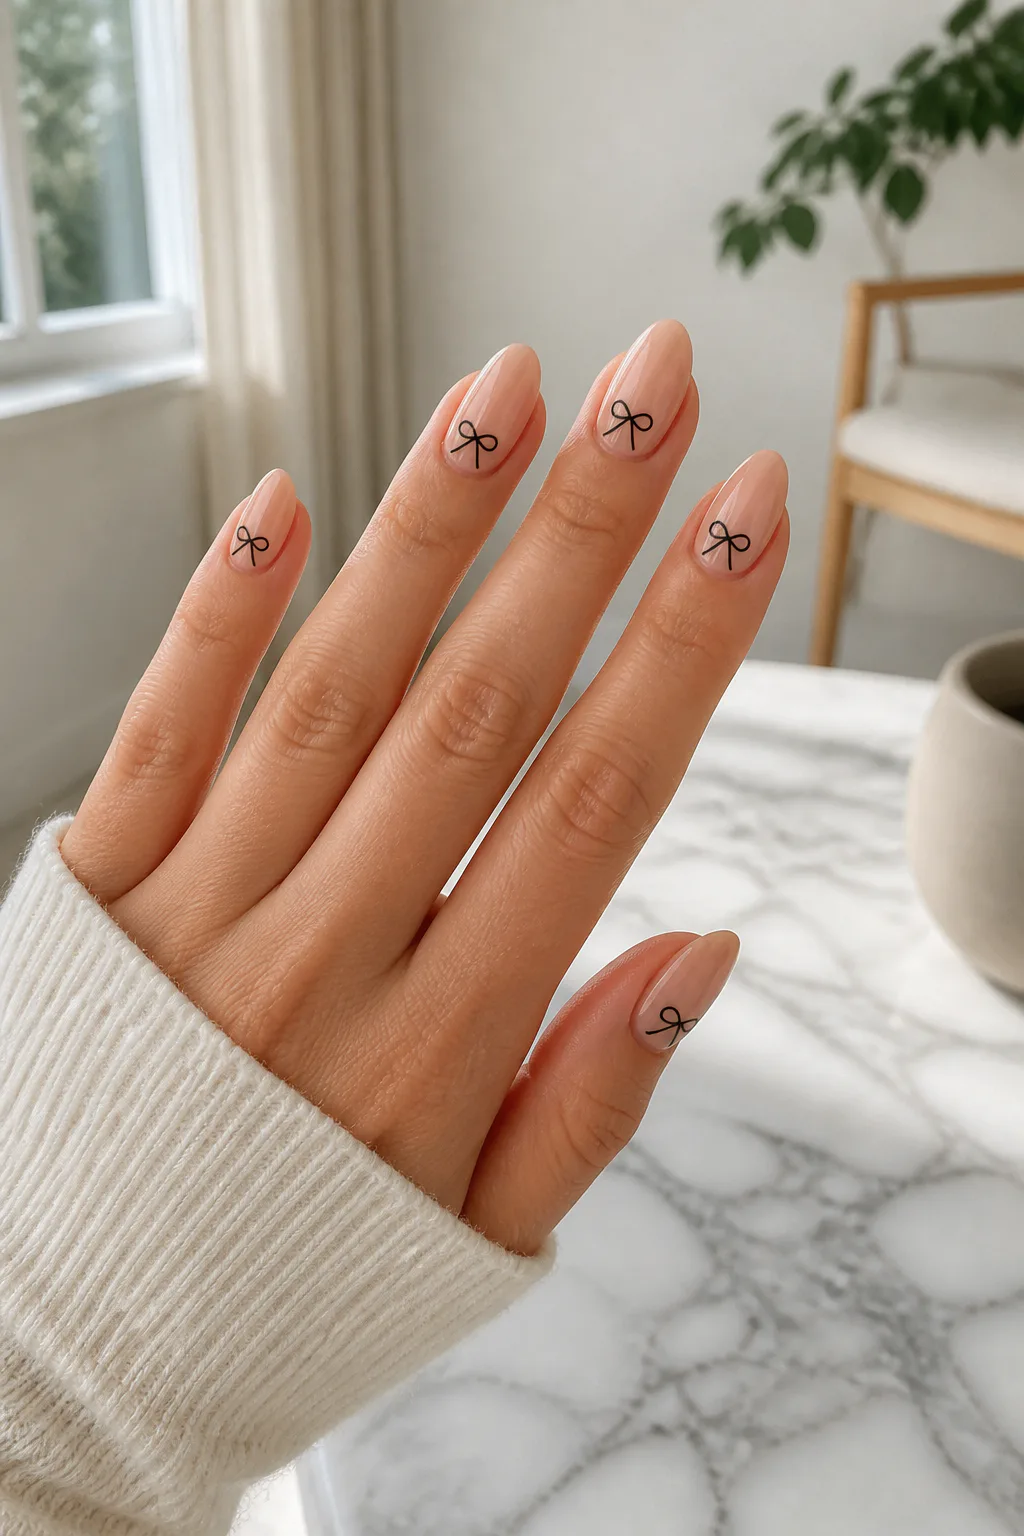
Fine black ribbon bows bring a graphic touch to glossy nude nails while keeping the overall manicure clean and understated. The contrast is crisp, but the delicate linework prevents the design from feeling heavy. A bow near the cuticle looks dainty; one near the tip can make a simple manicure feel more playful.
This is a good option if you like bow nails but prefer a flatter, low-profile design. It works across a range of nail shapes and lengths, and the neutral base makes it easy to wear with everyday outfits. The key is keeping the bows small and the painted lines even.
Placement and linework tips
A fine nail-art brush or a small bow decal can help create tidy loops and tails. Leave breathing room around each motif so the nude polish remains part of the design.
- Try a single bow on each ring finger.
- Place tiny bows near the cuticle for a delicate look.
- Use glossy nude polish to give the black details definition.
3. French Tips with Centered Bow Details

A French manicure already draws attention to the nail tips, and a small bow where the curved smile line meets the center adds a pretty finishing touch. The bow can be painted in white to blend with a classic French tip, or in a soft accent shade for a little contrast.
This design is especially lovely on oval or almond nails, where the curved tip and bow feel naturally connected. On shorter nails, a thinner French line and very small bow keep the nail from looking crowded. It’s a versatile choice for anyone who wants a familiar manicure with a subtle twist.
Make the bow feel intentional
Keep the bow centered on the smile line rather than adding several competing details. A clean base and consistent tip shape help the small motif look deliberate and refined.
- Choose white tips for a classic finish.
- Try pastel tips with matching bows for a softer variation.
- Keep the bow small enough to leave the French edge visible.
4. Silver Chrome Nails with Satin Bows

Silver chrome or pearlescent polish creates a luminous background for satin-like ribbon accents. The reflective base feels modern and a little futuristic, while the bow brings in a softer, ballet-inspired note. Together, the finishes make a statement without relying on a complicated pattern.
This manicure can be worn as a full set or adapted with chrome on a few nails and bow details on others. The metallic effect catches the light, so even a simple bow shape feels noticeable. It’s a fun direction for events or for anyone who enjoys a cool-toned, polished look.
Pairing the finishes
Ask for a smooth chrome surface and a bow that contrasts in texture or tone. A metallic molded accent can blend in, while a pale satin or white bow will stand out more clearly.
- Use a pearly silver base for a softer shimmer.
- Place dimensional bows on one or two accent nails.
- Keep extra gems minimal so the chrome remains the focus.
5. Cherry Red Nails with Tiny Ribbon Bows

Bright cherry-red nails feel lively and confident, and tiny ribbon bows add a playful detail to the bold color. Pairing the bows with small cherry-stem accents ties the theme together, creating a manicure that feels whimsical without needing a different design on every nail.
You can keep the red glossy and let the details do the decorating, or use a few white bows for crisp contrast. This look suits short and medium nail lengths particularly well because the cherry motifs can stay compact. It’s a cheerful choice for summer, holidays, or whenever you want a colorful manicure.
Keep the motifs readable
Small accents look best when they have space around them. A nail artist can place a cherry and bow together on one or two nails, leaving the others solid red for balance.
- Try red bows for a coordinated, tonal effect.
- Use white bows when you want more contrast.
- Keep cherry stems simple and fine-lined.
6. Baby Blue Plaid Nails with White Bows
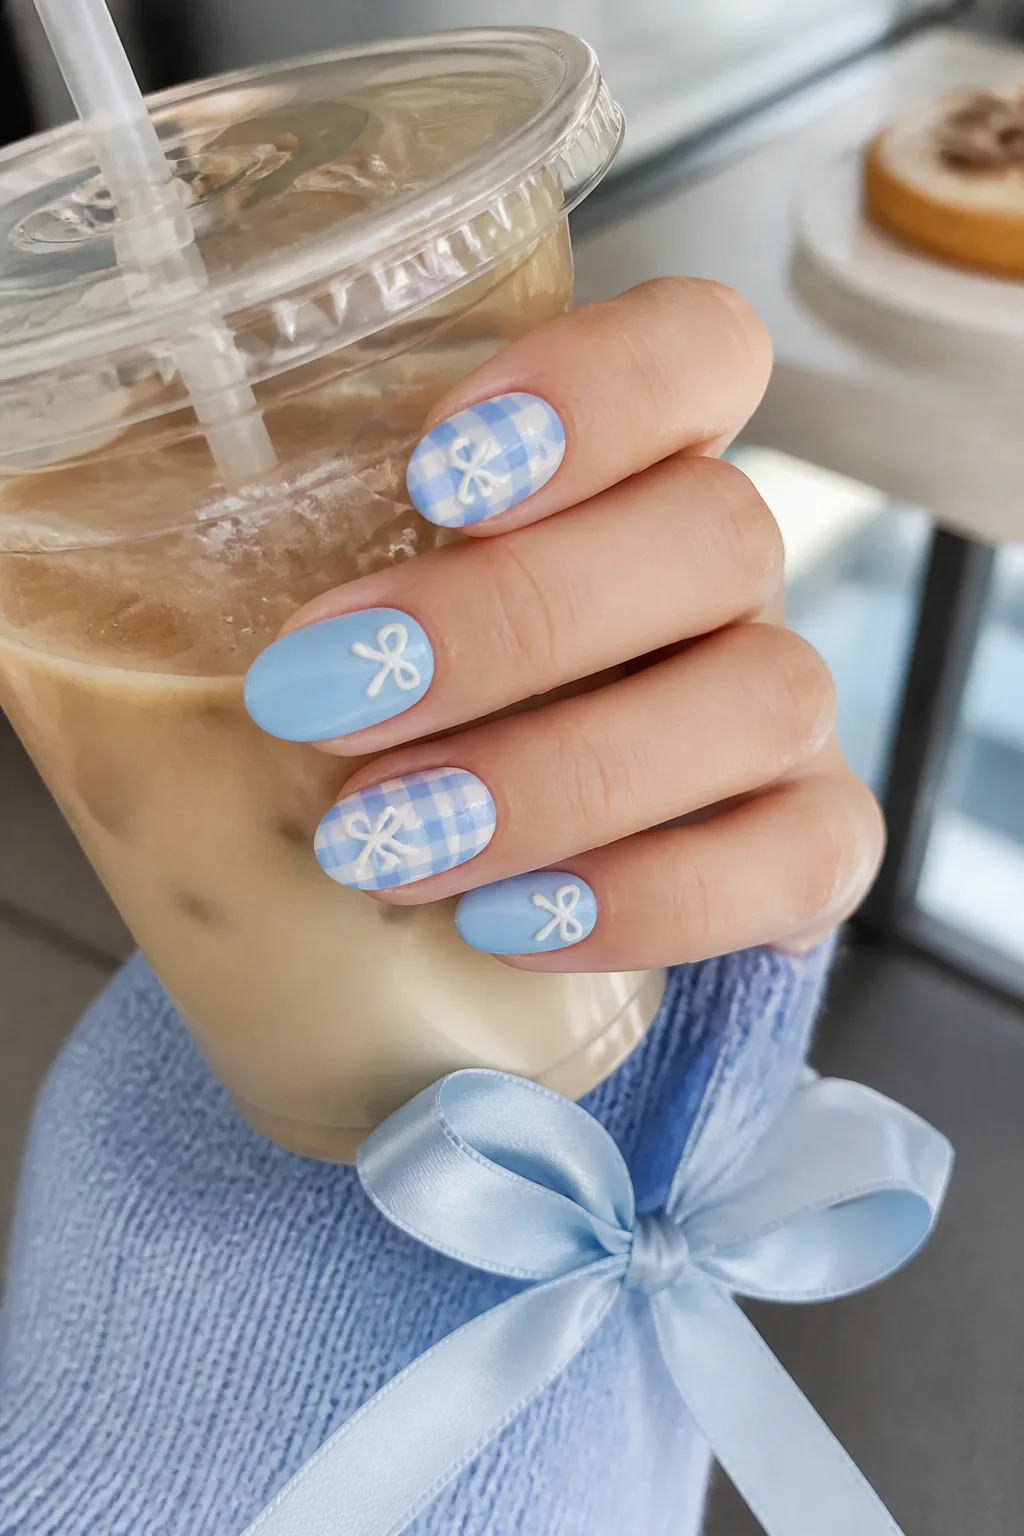
Baby-blue plaid or checkerboard gives this manicure a cozy, playful foundation. White bows layered over the pattern add texture and a sweet finishing detail, while a satin-blue bow can create a more coordinated look. The mix of graphic lines and soft embellishment keeps the set interesting.
Because plaid can be visually busy, it often works best on a few nails rather than across the whole hand. Solid blue nails between patterned accents provide a visual pause and give the bows more room to stand out. This design suits anyone drawn to cottage-inspired details and gentle pastel color.
Work with the pattern
Keep the plaid lines fine and the color palette limited so the bow does not disappear into the background. A raised accent can sit on a solid nail, or be placed over a quieter area of the pattern.
- Alternate plaid nails with solid baby blue.
- Choose white bows for clear contrast.
- Use a small bow on patterned nails to avoid crowding.
7. Dark Grunge Nails with Gothic Bows

A glossy black or dark-cherry base gives bow nails a moodier, more dramatic feel. Stark white bows stand out sharply against the deep color, while silver studs or metallic detailing can push the design toward a gothic look. The contrast makes the bow feel less sugary and more like a deliberate statement.
This style works well on longer nails, where there is room for dark polish and an accent motif, but it can also be adapted to short nails with a single small bow. Choose one or two decorated nails if you want the manicure to feel wearable, or repeat the motif for a bolder finish.
Balance dark color and detail
A smooth, glossy base helps the design look polished. If adding studs, use them sparingly around the bow so the embellishments frame rather than overwhelm the shape.
- Pair black polish with a white painted bow.
- Try dark cherry for a softer alternative to black.
- Use silver accents as small highlights, not a full border.
8. Glazed Donut Nails with Soft White Bows
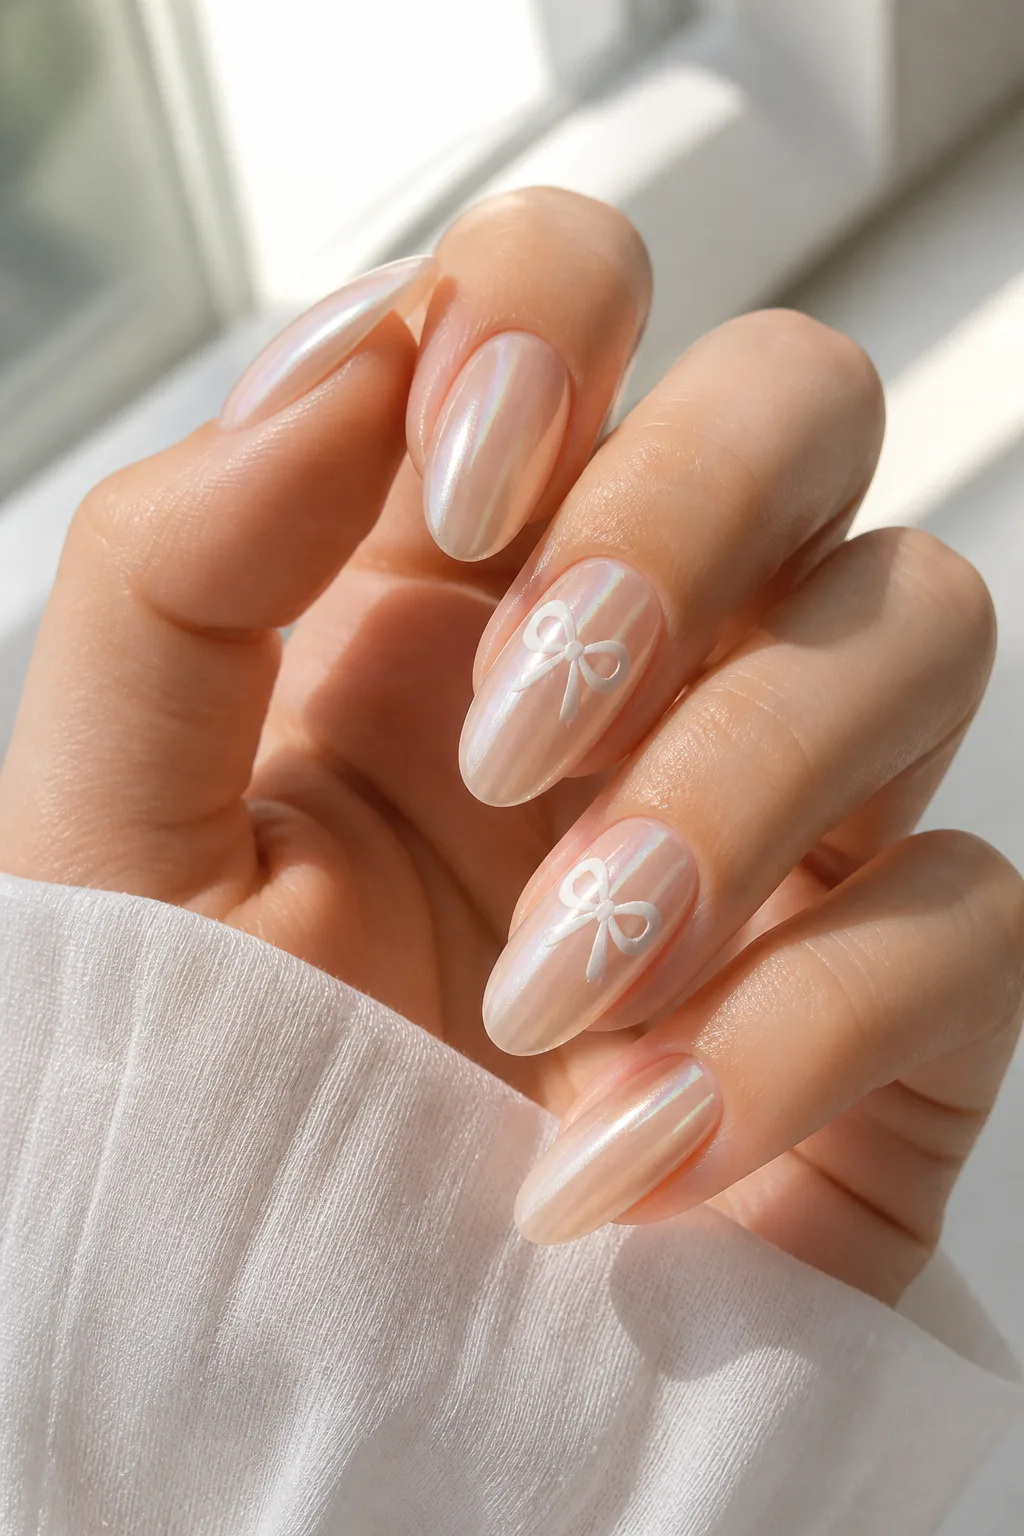
A neutral glazed-chrome finish gives this manicure a pearly glow that feels subtle in daylight and luminous under brighter light. Soft white bows add a gentle decorative layer without competing with the shine. The result is a refined take on bow nails that stays light and easy to pair with different outfits.
Airbrushed bows can create a soft, hazy effect, while decals give a more defined shape. Either option works over a sheer beige or pink base topped with a glazed finish. This design is especially appealing if you want a little nail art but still prefer a neutral manicure.
Choose the right level of definition
Consider how much contrast you want between the bow and the base. A crisp white sticker stands out, while a softly blended bow feels more understated and lets the pearly finish remain prominent.
- Start with a sheer neutral base.
- Add a pearly chrome layer for the glazed effect.
- Place bows on one or two nails for a clean look.
9. Confetti Nails with a 3D Bow Accent

Pastel confetti or fine glitter adds color and sparkle beneath a clear or translucent gel finish. A prominent 3D acrylic bow on the ring finger becomes the focal point, giving the manicure a playful balance between scattered shimmer and one sculptural detail.
This idea is a natural fit for parties, birthdays, or anyone who likes a celebratory manicure. To keep the confetti from feeling too busy, use it on a few nails and leave the others simpler. A single accent bow can then shine without competing with multiple large decorations.
Build the design in layers
Place the confetti so it looks scattered rather than packed into one area, and seal it beneath a smooth finish. A well-sized bow should be noticeable but comfortable enough for daily activities.
- Choose pastel flecks for a soft, cheerful palette.
- Use micro-glitter for a more even sparkle.
- Keep the 3D bow on one accent nail.
10. Pink Aura Nails with Floating Bows

A pink-to-white aura gradient creates a soft glow that seems to bloom from the center of each nail. Translucent dimensional bows layered over the blend can appear to float above the color, adding depth while preserving the dreamy, airy feeling of the manicure.
This design is especially effective on medium or longer nails, where the gradient has room to fade and the dimensional details can be seen. On shorter nails, a single accent bow keeps the look clear. The color transition can be subtle or more defined, depending on whether you want a delicate wash or a stronger pink center.
Keep the gradient soft
Ask for the aura blend to fade smoothly into the surrounding base. Transparent or pale bows maintain the floating effect, while opaque white details will create a more noticeable contrast.
- Use pink and white for a gentle, romantic palette.
- Choose translucent bows for a light layered effect.
- Limit larger accents to one or two nails.
11. Tortoiseshell Nails with Cream Bow Accents

Tortoiseshell brings warm, layered tones to a bow manicure, with amber, brown, and dark details that feel rich and polished. Cream nails give the eye a calmer place to rest, and a small gold-foil or black bow on those nails links the accent back to the pattern.
This mix works well if you like statement nail art but want to avoid an all-over print. The contrast between the patterned nails and the solid cream ones makes each element easier to appreciate. It’s a versatile design for autumn colors, though the warm palette can work throughout the year.
Coordinate the accent nails
Keep the tortoiseshell concentrated on a few nails and use cream as the supporting shade. A black bow creates a crisp graphic accent; gold foil adds a softer glint.
- Choose two or three nails for tortoiseshell pattern.
- Use cream polish on the remaining nails.
- Match the bow detail to your preferred contrast level.
12. Pastel Skittle Nails with Matching Bows
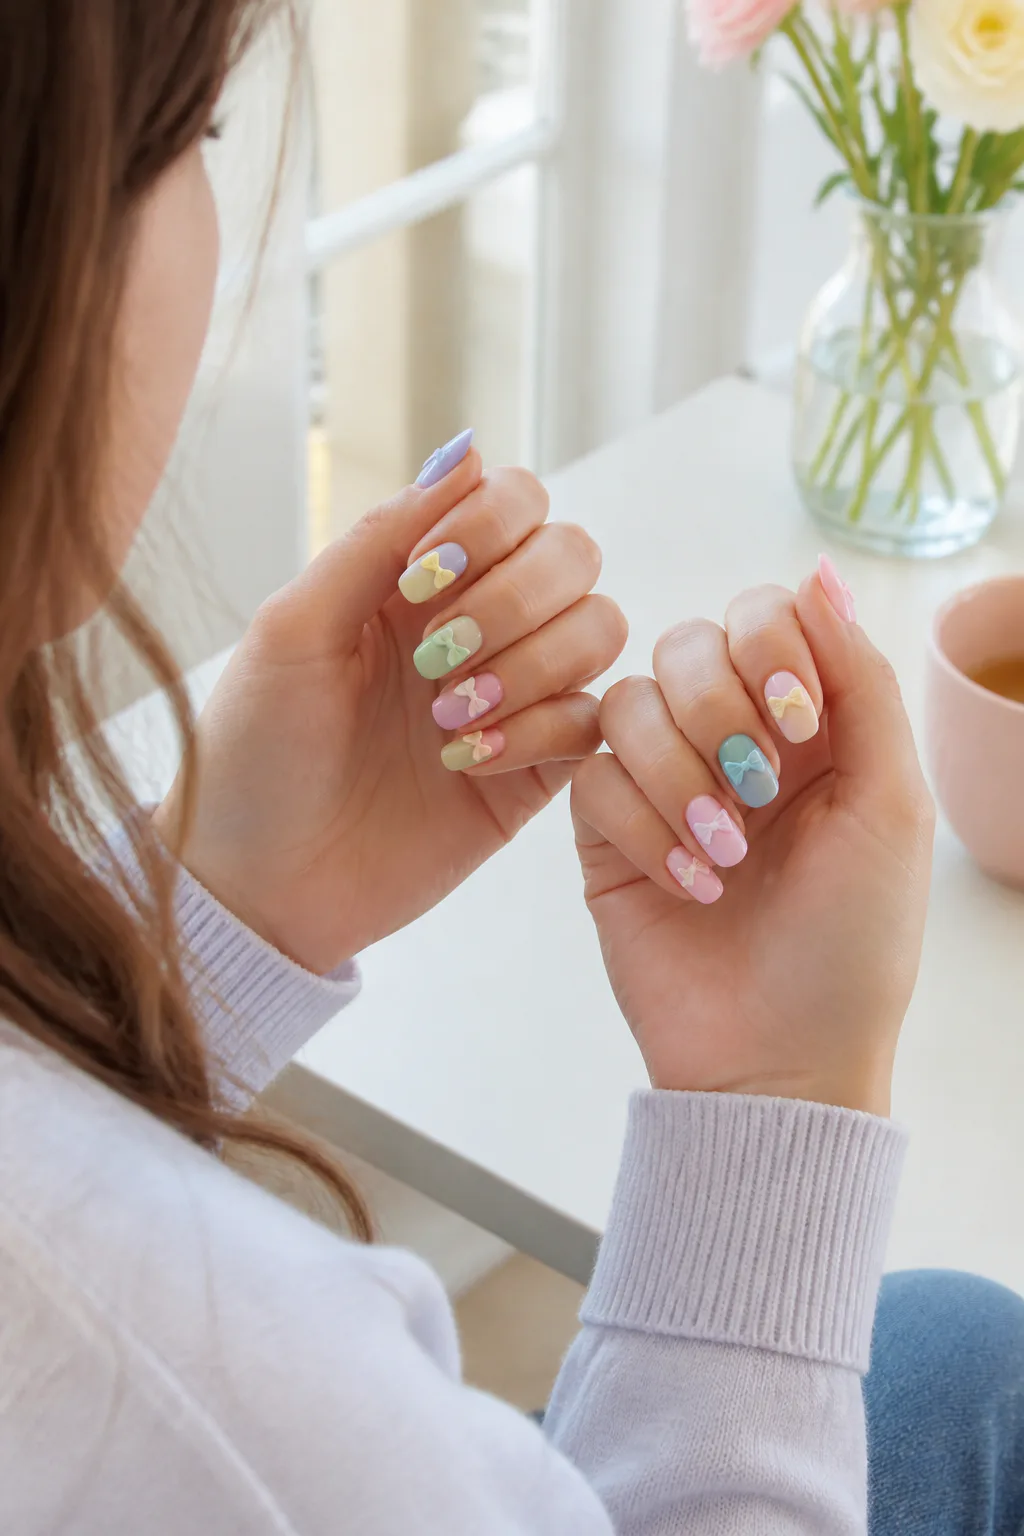
Pastel skittle nails give each finger its own shade, such as lavender, butter yellow, mint, or baby pink. A tiny bow matched to each nail’s color creates a coordinated set even though the polish changes from finger to finger. The result feels cheerful and carefully styled.
This look can be as subtle or as playful as you like. Choose soft, muted pastels for a gentle finish, or brighter candy tones for more energy. Since every nail already has a color and a bow, keeping the shapes small helps the manicure feel intentional rather than crowded.
Make the shades work together
Pick a consistent color family so the set feels unified. Bows can be painted in a slightly deeper version of each shade, or kept tonal for a more delicate effect.
- Choose four or five pastels that harmonize.
- Repeat the same tiny bow shape on each nail.
- Use a glossy top coat to unify the different colors.
13. Denim Blue Nails with White Lace Bows
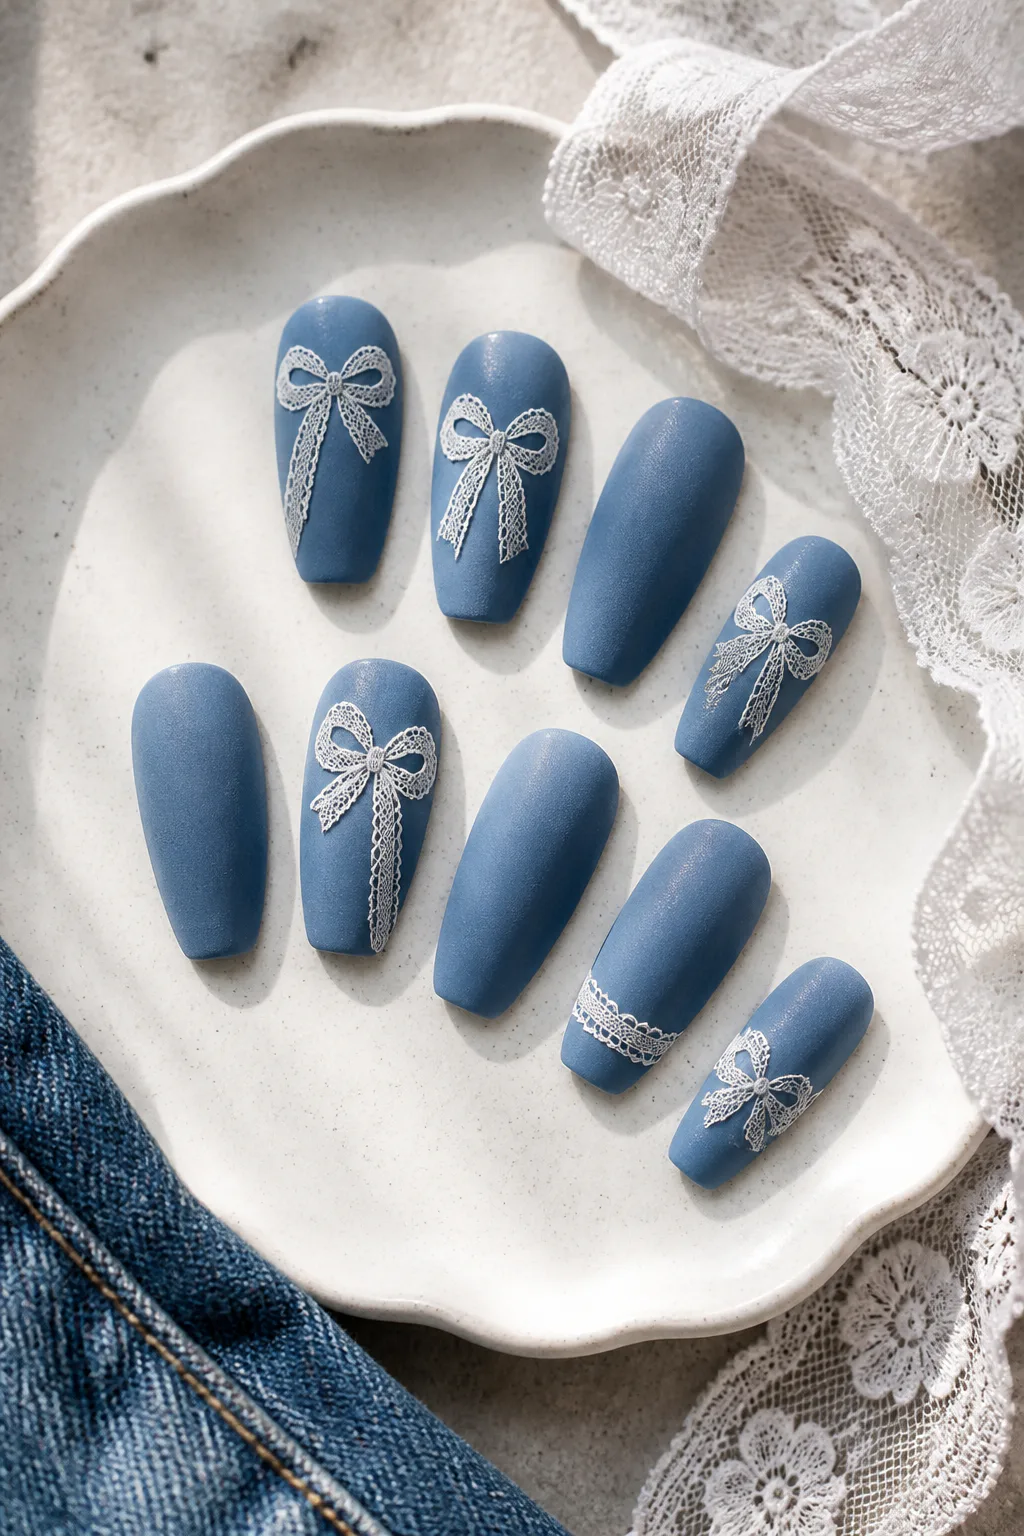
Denim-blue polish brings a casual, textured feel to this design, especially when finished with a matte or softly textured surface. White lace-style ribbon decals add a delicate contrast, making the manicure feel like a mix of everyday denim and feminine embellishment.
For a simpler version, keep most nails solid blue and add lace bows to one or two accents. If you enjoy more detailed nail art, a fine lace motif can extend around the bow or along the nail edge. The design works across lengths, though a clean base helps the white details remain easy to see.
Bring out the lace detail
Use a smooth white decal or careful hand-painted lines over the blue base. A matte finish gives the denim effect more character, while glossy polish creates a cleaner, brighter contrast.
- Try a matte blue base for a fabric-like impression.
- Use white lace decals for intricate detail.
- Keep some nails plain to give the accents room.
14. Negative Space Nails with Ribbon Frames
Negative-space designs leave parts of the natural nail visible, using thin ribbon lines to frame the edges. Instead of placing a bow in the center, the artwork traces the nail’s outline and may meet in a small knot or bow detail. This gives the manicure a light, airy look that does not rely on a solid coat of color.
The design is a lovely choice if you prefer minimal nail art or want something that feels graphic but not busy. It can be created over a clear base or paired with a sheer neutral shade. Fine lines are especially flattering on shorter nails because they decorate the edge without taking up much visual space.
Keep the frame delicate
A steady brush or narrow decals help maintain even spacing along the nail. Leave enough clear space between the ribbon lines so the frame stays distinct and the negative space remains part of the design.
- Use black, white, or a soft metallic for the outline.
- Keep the ribbon lines thin and consistent.
- Add a small bow only where the frame naturally meets.
15. Milky White Nails with Pearl Lace Bows

A milky white base creates a soft, luminous foundation for scattered micro-pearls and a lace-embossed 3D bow. The layered textures give the manicure a dressy, bridal feel, while the creamy translucence keeps it from looking too stark. It’s an elegant option for formal events or anyone who loves detailed, romantic nails.
Because the pearls and bow add dimension, the design often looks best when the embellishments are placed selectively. One accent nail can carry the raised lace bow, with a few tiny pearls scattered nearby or across the set. This leaves enough open space for the milky base to show through.
Make the embellishments wearable
Ask for the bow to be secured smoothly and kept at a comfortable size. A glossy finish emphasizes the pearly quality, while a clean shape helps the intricate lace detail remain the star.
- Choose a sheer milky white rather than an opaque white.
- Use micro-pearls sparingly across the set.
- Reserve the lace-embossed bow for an accent nail.
Final Thoughts
Bow nails can be as understated as a tiny painted ribbon on a nude base or as expressive as a sculpted 3D accent surrounded by pearls, chrome, or confetti. Start with the finish and color palette you already enjoy, then choose a bow style that complements it rather than competing for attention.
If you’re unsure which design to try, bring a reference to your nail appointment or test the look with decals before choosing dimensional details. A smaller bow on one accent nail is an easy way to explore the trend, while a coordinated set can make the ribbon motif the star of your manicure.